What Are The Ways To Project Image On Wall From iPhone – A Classic Use Case of iOS ArKit Framework
Tools, such as ARkit, were created to make it easy for developers to create augmented reality apps and games for iOS devices. If you’ve ever thought of trying your hands on some AR projects, you can start with creating augmented reality apps that can carry out simple tasks. Let us look at how you can create something that projects an image on the wall from an iPhone.
What You Will Need
- A mac system, running on MacOS 10.13.2 or later
- Xcode 9.4 or above.
- An iPhone with iOS 11+ on an A9 or higher processor (iPhone 6S and up)
- Swift 4.0.
- An Apple Developer account.
Getting Ready to Start
There are certain resources (Swift file and 2D assets) you would need to get on with the task. Click on this link to download a folder containing these files. They are zipped and you would have to unzip them after downloading.Related: Spark AR
Step 1: Set up your AR project in Xcode
On your Mac, launch Xcode and on the welcome screen, click on “Create a new Xcode project”. After that, select “Augmented Reality App,” and click on “Next”.
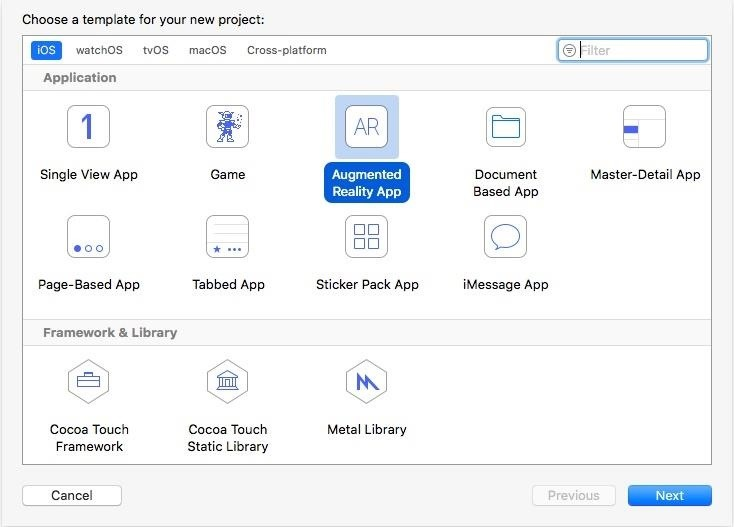
A form will come up, prompting you to fill out some options for the new project you’re creating. When you get to the Language option, choose “Swift” and for Content Technology choose “SceneKit”.
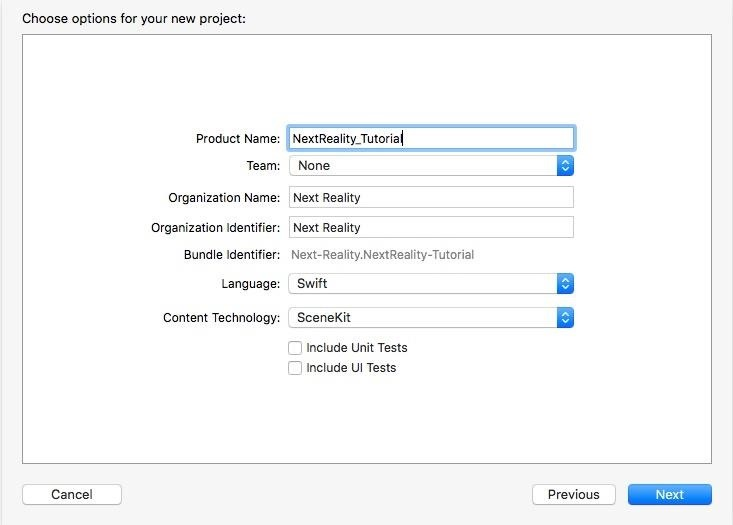
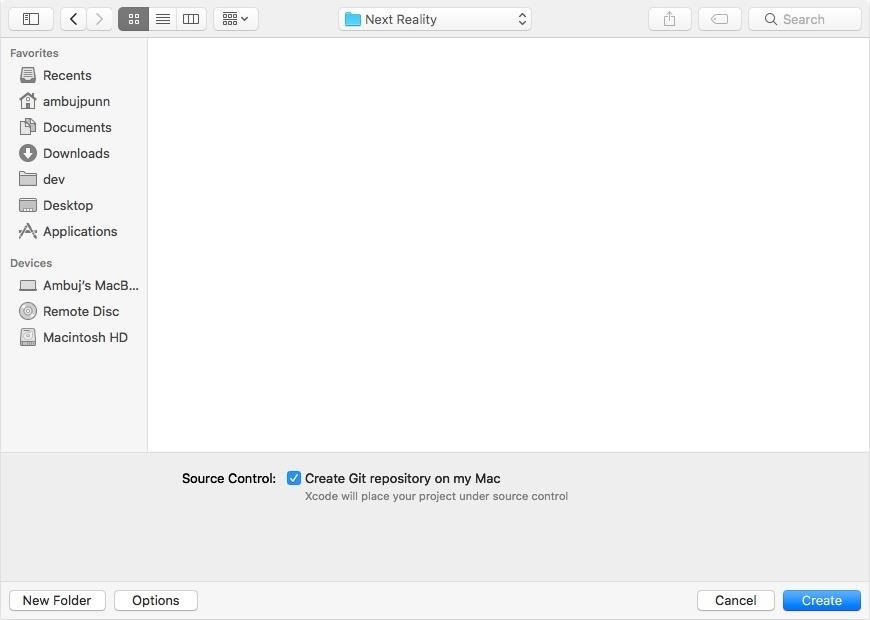
Next, choose where your project will be saved. Also, uncheck the “Create Git repository on my Mac” checkbox, and finish up by clicking on “Create”.
Related: What does augment mean
On the window that opens up next, look under the General tab, you’ll find “Signing”. Make sure the option “Automatically manage signing” is checked. Also, set “Team” to your Apple Developer account. Set Deployment Target to “11.0” (this shows the minimum iOS requirement for the app to run on any device).

Related: Augmented Product
Step 2: Import Assets into Your Project
Click on the “Assets.xcassets” folder in the project navigator. The right side of the project navigator is divided into two areas; right-click on the left pane and choose “Import” so you can add the “overlay_grid.png” and the “mona-lisa.jpg” files from the Assets folder.

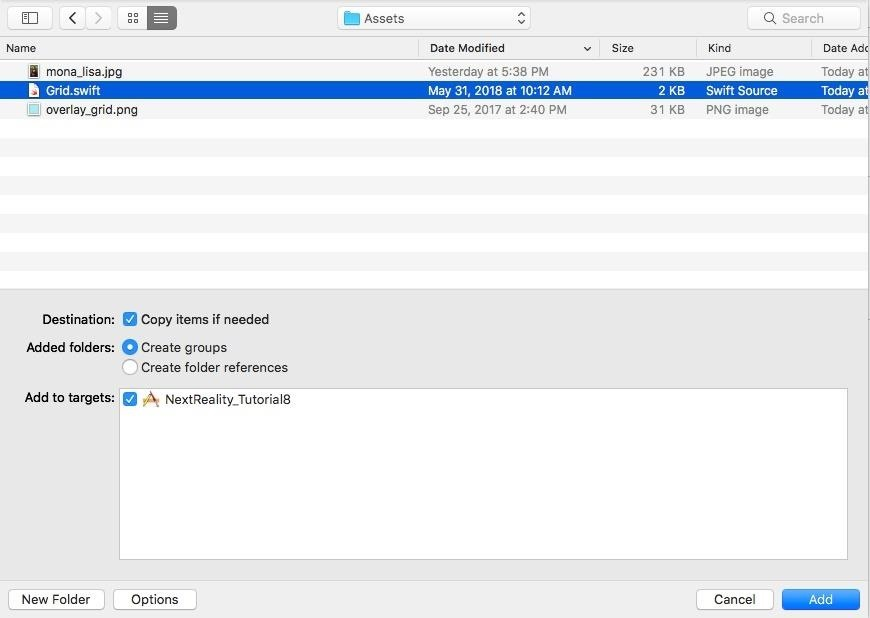
Next, once again in the project navigator, right-click on the yellow folder bearing the name of your project. Choose the “Add Files to ‘NextReality_Tutorial8” option.

Navigate to the Assets folder, and choose the “Grid.swift” file. Check “Copy items if needed” and click on “Add.”
Related: Augmented Reality Books For Ipad
Step 3: Place a Grid to Show Detected Vertical Planes
Open the “ViewController.swift” class by double-clicking it, then modify the scene creation line in the viewDidLoad() method. Change it from:let scene = SCNScene(named: "art.scnassets/ship.scn")!
To:let scene = SCNScene()
Look for this line:@IBOutlet var sceneView: ARSCNView!
Under it, add:var grids = [Grid]()
Paste the code below to the end of the file.func renderer(_ renderer: SCNSceneRenderer, didAdd node: SCNNode, for anchor: ARAnchor) {
guard let planeAnchor = anchor as? ARPlaneAnchor, planeAnchor.alignment == .vertical else { return }
let grid = Grid(anchor: planeAnchor)
self.grids.append(grid)
node.addChildNode(grid)
}
func renderer(_ renderer: SCNSceneRenderer, didUpdate node: SCNNode, for anchor: ARAnchor) {
guard let planeAnchor = anchor as? ARPlaneAnchor, planeAnchor.alignment == .vertical else { return }
let grid = self.grids.filter { grid in
return grid.anchor.identifier == planeAnchor.identifier
}.first
guard let foundGrid = grid else {
return
}
foundGrid.update(anchor: planeAnchor)
}
Under this line in viewDidLoad(): sceneView.showsStatistics = true
Add: sceneView.debugOptions = ARSCNDebugOptions.showFeaturePoints
Under this line in viewWillAppear(): let configuration = ARWorldTrackingConfiguration()
Add: configuration.planeDetection = .vertical
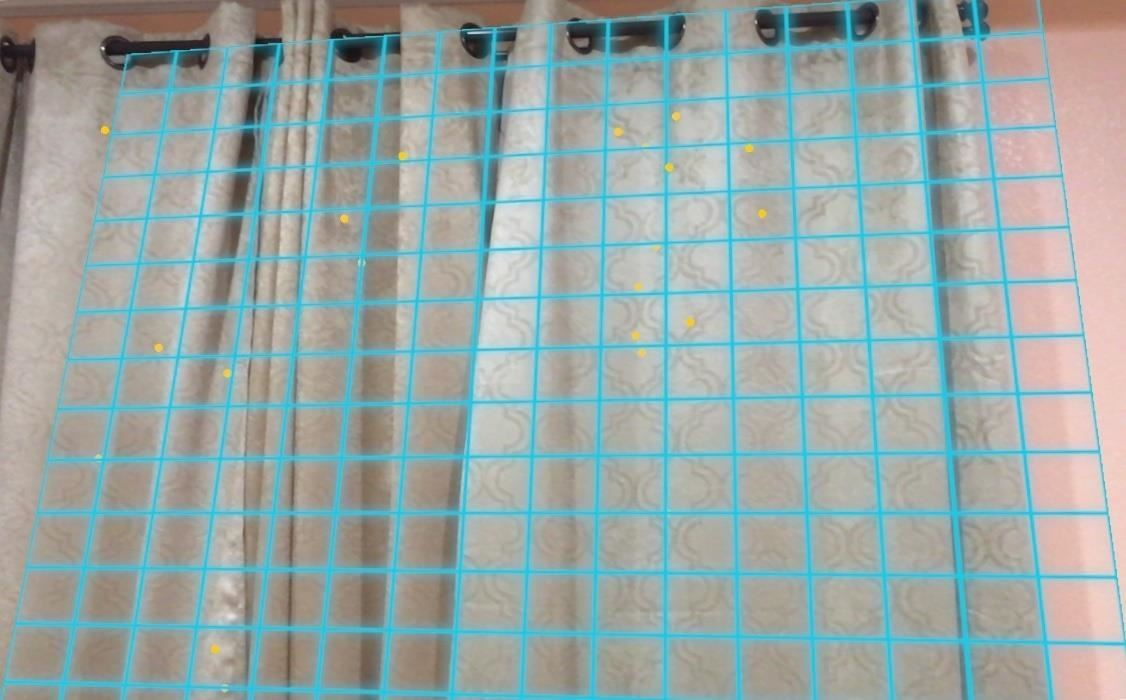
You can do a test run of your app on your phone. Try walking around, focus on a well-lit wall or flat, vertical surface. Whenever it detects a vertical plane, blue grids should appear.
Step 4: Place the Mona Lisa on a Wall
To add gesture recognizers on your scene view, open the “ViewController.swift” class, and at the end of the viewDidLoad() method, add these lines:let gestureRecognizer = UITapGestureRecognizer(target: self, action: #selector(tapped))
sceneView.addGestureRecognizer(gestureRecognizer)
Next, let’s add the tapped() method to be called when a tap gesture on the phone is registered. Add the following code contains a method that will be invoked when the phone is tapped. Add it to the bottom of the file, before the last curly bracket ( } ):@objc func tapped(gesture: UITapGestureRecognizer) {
// Get 2D position of touch event on screen
let touchPosition = gesture.location(in: sceneView)
// Translate those 2D points to 3D points using hitTest (existing plane)
let hitTestResults = sceneView.hitTest(touchPosition, types: .existingPlaneUsingExtent)
// Get hitTest results and ensure that the hitTest corresponds to a grid that has been placed on a wall
guard let hitTest = hitTestResults.first, let anchor = hitTest.anchor as? ARPlaneAnchor, let gridIndex = grids.index(where: { $0.anchor == anchor }) else {
return
}
addPainting(hitTest, grids[gridIndex])
}
Next, add the addPainting() under the tapped() method, but before the last curly bracket ( } ) in the file:func addPainting(_ hitResult: ARHitTestResult, _ grid: Grid) {
// 1.
let planeGeometry = SCNPlane(width: 0.2, height: 0.35)
let material = SCNMaterial()
material.diffuse.contents = UIImage(named: "mona-lisa")
planeGeometry.materials = [material]
// 2.
let paintingNode = SCNNode(geometry: planeGeometry)
paintingNode.transform = SCNMatrix4(hitResult.anchor!.transform)
paintingNode.eulerAngles = SCNVector3(paintingNode.eulerAngles.x + (-Float.pi / 2), paintingNode.eulerAngles.y, paintingNode.eulerAngles.z)
paintingNode.position = SCNVector3(hitResult.worldTransform.columns.3.x, hitResult.worldTransform.columns.3.y, hitResult.worldTransform.columns.3.z)
sceneView.scene.rootNode.addChildNode(paintingNode)
grid.removeFromParentNode()
}
You can go on to save and run the app. Find a well-lit, textured vertical flat surface such as a wall.