Extend Your VR Experience: How to Change VR Controller Battery

Virtual Reality (VR) is an exciting way to experience new worlds and play immersive games. However, if you’ve recently noticed that your VR controller battery is running low, it may be time to learn how to change VR controller battery. Knowing how to change the battery will extend your VR experience and ensure you always have enough power to explore the virtual world. This blog post will discuss how to change VR controller batteries and what steps to take to ensure a successful replacement.
Why Changing VR Controller Batteries is Important
Virtual Reality (VR) gaming has revolutionized how we experience and interact with digital worlds. The immersive nature of VR relies heavily on controllers, which serve as our primary means of navigating through these virtual realms. But what happens when your VR controller battery is running low? It can quickly bring your epic adventures to a halt.
This is why changing VR controller batteries is so important. Ensuring that your controller always has enough power allows you to extend your VR experience and explore virtual worlds to your heart’s content. Imagine being in an intense battle or on the verge of solving a mind-boggling puzzle, only to have your controller die on you. It’s a frustrating experience that can take you out of the moment.
Regularly changing the batteries in your VR controller prevents these sudden disruptions and helps maintain optimal performance. Low battery levels can lead to lagging or delayed response times, making it harder to immerse yourself in the virtual experience fully. By having fresh batteries in your controller, you can ensure a seamless and uninterrupted gameplay experience.
Moreover, how to change VR controller battery is essential for the longevity of your device. Over time, batteries can deteriorate and lose their ability to hold a charge. By regularly swapping out the batteries, you can extend the lifespan of your controller and avoid the hassle of having to replace it altogether.
So, whether you’re an avid VR gamer or enjoy occasional virtual adventures, changing your VR controller batteries is crucial in maximizing your enjoyment. The following section will guide you through changing your VR controller battery.
Step-by-Step Guide to Changing Your VR Controller Battery

So, you’ve noticed that your VR controller battery is running low, and you’re ready to learn how to change VR controller battery. Don’t worry. We’ve got you covered with this step-by-step guide to transforming your VR controller battery.
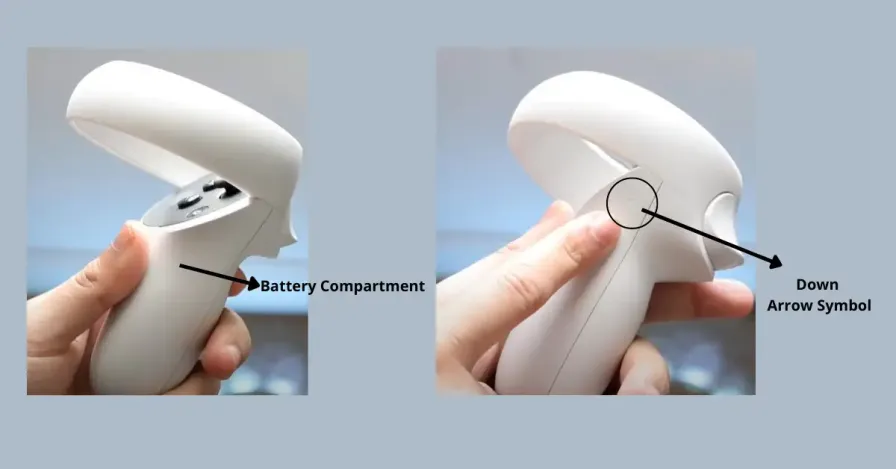
Step 1: Identify the battery compartment
First, locate the battery compartment on your VR controller. This is usually on the back or underside of the controller. It may be secured with a small screw or slid open.
Step 2: Open the battery compartment
If there is a screw securing the battery compartment, use a small screwdriver to loosen and remove it. If the compartment slides open, gently push or slide it in the direction indicated until it opens.
Step 3: Remove the old battery
Carefully remove the old battery from the compartment. Be sure to dispose of it properly, as batteries should never be thrown in the trash. Check with your local recycling center for proper disposal methods.
Step 4: Insert the new battery
Take your new battery and insert it into the compartment, making sure to align the positive and negative terminals correctly. Follow instructions or diagrams on the controller or battery to ensure proper placement.
Step 5: Close the battery compartment
If there was a screw securing the compartment, tighten it back into place using the small screwdriver. If the compartment slides, push it closed until it clicks or locks into place.
Step 6: Test your controller
Turn on your VR headset and ensure that your controller is properly functioning. If it is not working, double-check the battery placement and try again.
And there you have it! You’ve successfully changed your VR controller battery. Now, you can return to your virtual adventures with peace of mind, knowing you won’t be interrupted by a low storm. Happy gaming!
Maximizing Your VR Controller’s Battery Performance
Now that you know how to change VR controller battery, it’s time to learn how to optimize its performance. After all, what good is a fresh battery if it doesn’t last as long as possible? By following these tips, you can ensure that your VR controller stays powered up for extended periods, allowing you to dive deeper into the virtual worlds you love.
- Adjust controller settings: Most VR systems offer settings that allow you to adjust your controllers’ sensitivity and power usage. You can optimize your controller’s performance by tweaking these settings while minimizing battery drain. Experiment with different settings to find the balance that works best for you.
- Reduce controller vibrations: Vibrations in VR controllers can consume significant battery power. While they can add realism to your gameplay, they can drain your battery faster. Consider lowering the vibration intensity or turning it off altogether to conserve battery life.
- Dim the controller’s LED lights: Many VR controllers have LED lights that indicate their status or add visual flair to your gaming experience. However, these lights can be a drain on battery life. Check your VR system’s settings to see if you can dim or turn off the LED lights when unnecessary. This minor adjustment can go a long way in extending your battery life.
- Take breaks and turn off the controller: If you’re taking a break from VR gaming or not using your VR controller for an extended period, turn it off. Controllers can drain battery power even when not in use, so switching them off will help preserve battery life for when you’re ready to jump back into your virtual adventures.
By implementing these strategies, you can maximize the performance and lifespan of your VR controller’s battery. With a longer-lasting battery, you can explore virtual worlds to your heart’s content and never miss a beat in your epic VR quests.
Tips to Ensure a Longer Battery Life for Your VR Controller
If you want to extend your virtual reality (VR) experience and ensure that your VR controller battery lasts as long as possible, then you’re in the right place! In this section, we’ll share some tips and tricks to help you maximize the battery life of your VR controller.
- Optimize controller settings: One of the easiest ways to conserve battery power is by adjusting the settings on how to change VR controller battery. Most VR systems allow you to tweak your controllers’ sensitivity and power usage. Experiment with different settings to find the right balance between performance and battery drain.
- Minimize controller vibrations: While vibrations can add realism to your VR gameplay, they also consume significant battery power. Consider lowering the vibration intensity or turning it off to save battery life.
- Dim LED lights: Many VR controllers have LED lights that indicate their status or add visual flair to your gaming experience. However, these lights can be a drain on battery life. Check your VR system’s settings to see if you can dim or turn off the LED lights when they’re not necessary. This minor adjustment can go a long way in extending your battery life.
- Take breaks and turn off the controller: If you’re taking a break from VR gaming or not using your controller for an extended period, turn it off. Even when not in use, controllers can drain battery power. Switching them off when unnecessary will help preserve battery life when ready to return to your virtual adventures.
By implementing these simple strategies, you can maximize your VR controller’s battery life and never miss out on an epic VR quest. So dive into those virtual worlds with confidence, knowing that your VR controller will stay powered up for longer!